MuleSoft for Java developers.
Meetup recording. 31 May 2022
MuleSoft's approach to integration is to simplify and streamline the development effort by encapsulating commonly used connectivity logic, such as database connectors and enterprise integration patterns like Scatter-Gather. Thus, the time required to build an integration application is substantially reduced, and the developer's effort is redirected to innovation. When you only need to configure the existing logic, the focus moves to design, optimisation and creation of new integration solutions.
The catalogue of connectors, components and coded integration patterns that MuleSoft provides cannot possibly include every platform. Therefore, MuleSoft enables developers to write custom extensions - new connectors to access bespoke applications or implement new pattern logic. This extensibility allows the Mule runtime to adapt to business requirements and ensure that coding is done only once and reused many times
What's a MuleSoft connector?
Conceptually, a connector is just a library of code that encapsulates connectivity logic to link to another system. They're written in Java using the Mule SDK, an annotation-based Java framework provided by MuleSoft. Once coded, the connector can be published to a central repository called the Exchange. A newly developed connector becomes available to all developers within your organisation. The auto-generated graphical user interface allows configuring the connector's security details and options such as passwords, usernames, keys. And the best part is that the developers don't need to be experts in the underlying system to use a Mule application or use it in a Mule application.
A project for building a connector is based on the basic model structure and constructed from a Maven archetype. You can extend the Mule runtime by implementing sources, routers, scopes and function components. Today we implement the operations component to make a connector to an AWS service.
Building a connector to Amazon Polly service.
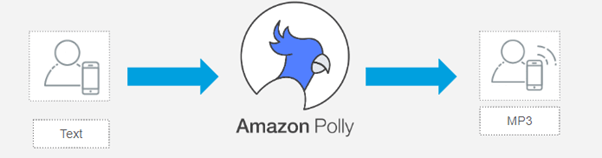
We start with an overview of the Amazon Polly service. It is a cloud service capable of synthesising text into human-like speech in male and female voices and multiple languages. The typical use cases for the Amazon Polly service include speech-enabled mobile applications, such as newsreaders, games or eLearning platforms, or even accessibility applications for visually impaired people. So how does it work? You provide a string of text, and the system generates a file in MP3 format.
Amazon Polly service requires minimal configuration, which consists of:
- Voice configuration - a name of the voice that is mapped to a language and gender;
- Engine, which determines if the voice should be generated in a conversational or newsreader style;
- AWS region;
- AWS keys, which include access key and secret.
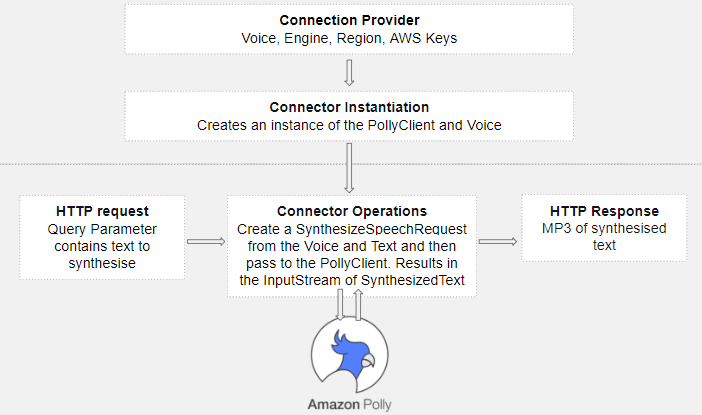
Let's look at how to code the connector that uses the Amazon Polly service and what classes it requires. There are two important aspects. The first one is the connection provider, which provides the voice engine region and AWS keys, as explained earlier. The connection provider can be used by the connector instantiation to create instances of Polly client and voice. The second aspect is to develop operations to call the Polly client, passing the text to synthesise and receiving the audio MP3 file of the synthesised text.
How to code Amazon Polly Connector?
Let's start the demo by opening the Anypoint Studio. If you are new to MuleSoft, Anypoint Studio is a MuleSoft modification over Eclipse. I've also installed the M2E plugin so I can do Java development, while the M2E plugin provides the support for Maven in the Eclipse IDE.
Create a project based on the Maven archetype.
We start building our connector by creating a new project based upon a Maven archetype. Select Maven Project and search for org.mule.extension archetype. Then select the Mule extension archetype. This archetype is provided by MuleSoft to create a skeleton for the project. The next step is to specify archetype parameters - groupId and artifactId, package name as well as extension names to configure the project.
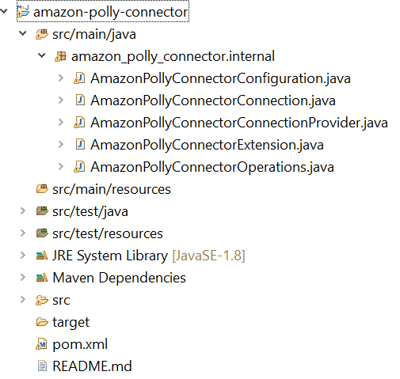
The project structure is a standard Java project, that contains the following classes
- Configuration,
- Connection,
- ConnectionProvider,
- Extension,
- Operations.
We need to add appropriate dependency management which is dependent on the Amazon AWS SDK. Using the SDK, you can easily build Java applications that work with Amazon. The SDK code contains Java code examples and real-world use cases for AWS services to speed up the development of your applications.
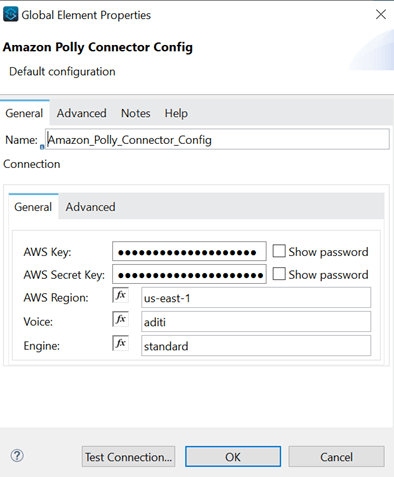
We start building the connector with the connection provider. Provider allows us to specify the components that make up the configuration - access key, access secret, AWS region, voice name, and engine. We add the appropriate annotations so they are recognised as a part of the provide. The next step is to add all these parameters to the Amazon Polly connector connection method.

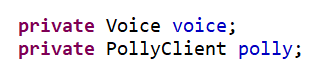
Now we need to code the actual connectivity logic in the Amazon Polly connector class. We add two fields - Voice and the PollyClient. These classes come from Amazon AWS SDK.
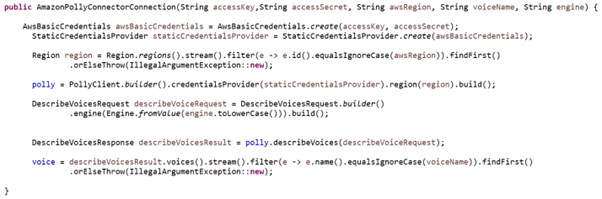
To create the connectivity logic, we pass all the parameters specified earlier in the provider to the constructor of the Amazon Polly connector connection class. The next step is to create the AWS basic credentials using the access secret and access key. Next, we retrieve the region and instantiate Polly and instances of describeVoicesRequest and describeVoicesResponse classes. Finally, we create the instance of voice.
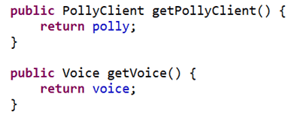
Now we need to code the 'getters' for the Polly and voice.
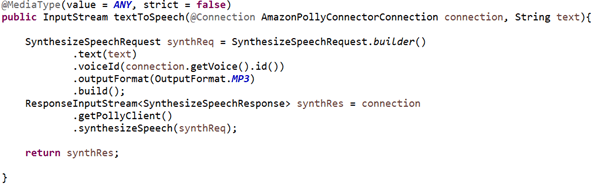
In the next step, we create the operations for the connector. In the Amazon Polly connector operations class, I will create a text-to-speech method that returns an input stream. This method takes the connection instance as an input parameter and a string of text. Inside the text-to-speech method, we instantiate synthesised speech request, which builds the request using the voice instance and a text string. Finally, using the Polly client we call the synthesised speech method and pass the request we’ve just created.
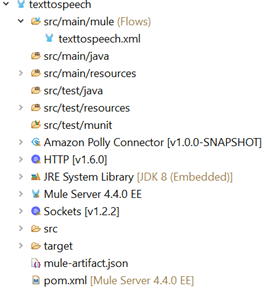
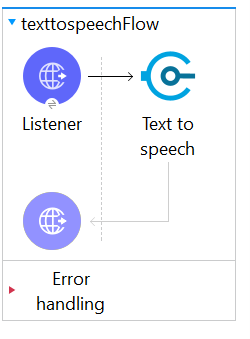
And that’s it! We’re done with coding our connector. Next, we will install the connector locally to use it in a Mule project. Once it's installed, we create a Mule project called textToSpeech. We build the project by selecting the HTTP listener from Mule Palette and dropping it onto the canvas. We then provide the configuration for our listener – we keep the default port and host. Then we provide the path name - 'text'. Now it's time to bring our connector in. We go to the POM file of the project and add the dependency on the connector. As you can see below, our Amazon Polly connector is on the left side, also in the Mule Palette.
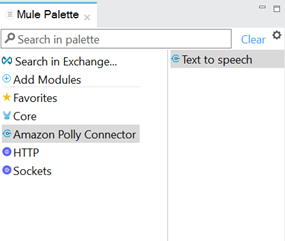
Now, we drag and drop the text-to-speech operation to the flow. We need to provide the configuration – as you can see, we have the AWS key, AWS secret key region, voice and engine that we configured in our connector provider class.
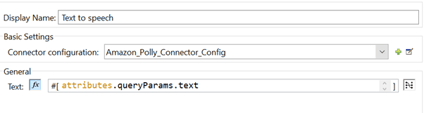
Now we need to provide text to be synthesised, which is passed as a query parameter.
And that’s it! We’re done with building our flow. It’s that simple:
Now we are ready to test our connector to Amazon Polly text to voice service by passing a simple text "This is the second meetup organised by Java Devs Meetup group". I paste this string to the query param and hit the end-point to, hopefully, hear our voice conversion.
The demo result: we've successfully converted text into spoken audio.
Deploy the connector to the MuleSoft Exchange
Once our new connector is built and tested, we deploy it to the Exchange. We add appropriate distribution management to the connector's POM file. By deploying the connector to Exchange, we share it with other developers within the organisation to reuse. They don’t need to spend time creating the same connector from scratch.
I've demonstrated how to connect to the Amazon Polly service and make it work!
Source code
mvn clean install -DskipTests
	<dependency>
			<groupId>uk.co.acme</groupId>
			<artifactId>amazon-polly-connector</artifactId>
			<version>1.0.0-SNAPSHOT</version>
			<classifier>mule-plugin</classifier>
	</dependency>
Conclusion
The objective of our second meetup was to demonstrate how simple it is to create a custom connector. We hope you found this demo useful and interesting. Why don't you watch the previous meetup to learn how to build APIs with Mule and SpringBoot.